

I came across this article about the garden begun by Michelle Obama at the White House last year. I love it. Now, if you read the article, the headline offers a bit of a sensational slant... oooooo, the garden isn't *really* organic! What are they really up to?! But I agree 100% with what they are doing.
From what I've read, it did start out with intentions of being an organic garden, and how exciting it is to me that they would try that! But technically speaking, "organic" is a very difficult standard to meet. Some folks may go as far to insist that "organic" means that all materials that are used as compost be organic - meaning that all kitchen scraps that go into the compost pile be from vegetables that were organically grown themselves, or even that any manures used be taken from sources where the livestock was organically or naturally raised. It just gets tricky. And when it's the White House Garden, you know the Republican press is going to be snooping around trying to prove some tomfoolery if you put it on out there, claiming it to be organic.
So - as the article says, it's not organic, but that's not the point. The point is, they are growing something, they are doing it naturally, they are learning from the process, they are sharing food and sharing knowledge, and they are setting a very fine example both here and abroad. They are also making what I feel is a very important change to be made in our country right now: actively changing the way food gets to their table. There's a lot of other good changes that come along with making that step - economic, social, cultural, and environmental changes to name some.
So get out there and grow something!
Friday, April 30, 2010
Thursday, April 29, 2010
Succession Gardening: Plant, Harvest, Repeat.

Layering works spectacularly well with tomatoes, and it can also work with cucumbers. As the existing tomato plants in your garden mature, choose a healthy branch or two at the base of the plant, and gently weigh it down a bit so that it lays on the ground. If it doesn't reach all the way to the soil, keep a weight on it overnight or for a few days - you could gently lay the handle of a rake or something across it, but be careful not to break, bruise, or tear it off your tomato plant. Once the branch is in good contact with the soil, pinch the leaves off of a section about 5" long and then shovel soil over that section of the branch. Leave it for a couple of weeks, making sure the buried portion gets plenty of water, then chop the branch between the parent plant and the part of the branch you have buried. Leave it for another week so that it gets the idea that it's on its own, then dig up the new plant and put it in its own great sunny spot.
Or in the case of row crops like corn, okra, or green beans which generally bloom and produce all they are going to within a few weeks and then give out, you might want to seed one row or patch, and then a second one two weeks later, and even a third or fourth round after that.
Herbs such as basil work great in succession as well. Once herbs bolt, or flower, they are past their prime in flavor and will soon go dormant. If you scatter basil seeds a little at a time - say on a weekly basis - you'll have a much longer harvest period. This is a great advantage for herbs that are best used fresh, as you likely wouldn't have need for all that basil at one time! (Unless of course you are making a lot of pesto.)
Wednesday, April 28, 2010
I'm trying to convince my early spring garden
that sex is overrated... but it isn't working.
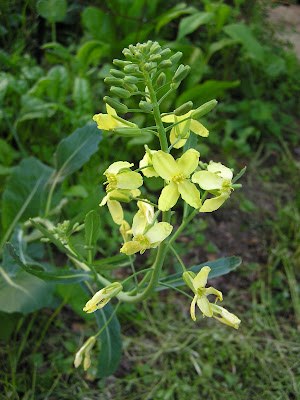 This is called bolting. Summer vegetables are desirable for the fruit that follows flowers, so flowering is encouraged. Early spring crops or herbs are usually more desirable for their leaves, and once they begin to flower the plant stops putting energy towards growing beautiful, flavorful leaves and instead focuses on reproducing. This is a photo of my collards. My arugula and spinach are at it too!
I had high hopes for my spring garden this year as I started it plenty early enough. I'm usually a bit late with it, but this time had it right. I mixed compost and ash into the soil, planted my seeds and seedlings, and mulched my beds with leaves leftover from autumn. And then I waited. I must admit that I'm still rather childlike when it comes to planting seeds. Though I fully understand it takes at least 7 days, if not 14, for seeds to sprout, I still go out and look at them the next morning, just in case. And I check on them every morning after that.
This spring was a little different from past springs when it came to my early garden though. I checked, and I checked, and I checked... and I got really, really sad. There was nothing - not after one week, not after two, not after three, and not after four. I began to think it must have been a really bad idea for me to hang a new birdfeeder right near my new garden, wondering if the birds had eaten spinach and snow pea seeds or sprouts in addition to sunflower seeds and millet. And I began to feel really discouraged about this gardening season; after all, early spring gardens are pretty easy to grow!
But then, I saw some green, and what I realized is that with a prolonged winter/cooler spring, the soil took longer to warm up and delayed germination. Whew! It wasn't me! My seedlings were finally off to a great start. But next we had several days when temps were in the mid-80's! This will send young plants into their unruly late teenage days faster than anything else... and so, without producing big, full, beautiful leaves, my garden produced flowers.
I am still able to enjoy some great spinach since I planted a lot of it, and the romaine takes its time to flower, and though the arugula's flowering makes it quite potent, I like it that way - so I'm happy with the results overall. I also learned a great lesson about the intricacy of early spring gardens, and I now know how to watch the temperatures better next year.
My consolation prize with the collards is that I'll begin this year saving my own seeds - to plant either this fall or next spring. I need to look into what's best as some seeds need to endure a "winter" before they will germinate. It may be that if I want to plant the seeds this fall I'll need to put them in the freezer for awhile first.
The best kind of salad
is the first one that goes from garden to table in a matter of minutes. Here we have romaine lettuce, spinach, and some very spicy arugula, with a little chard for a garnish. Mmmmmmmm....


Tuesday, April 27, 2010
Seeds and Seedlings: How to Plant Them
When planting seeds, the things to pay attention to are spacing and depth, and recommendations for both can be found on the back of the seed packet. Spacing is how far apart you'll be planting your seeds. Most instructions on spacing suggest planting more seeds closer and thinning them later - removing or transplanting every-other sprout so that they have enough room to grow. This gives you the opportunity to make sure you get the number of sprouts you want but also making sure that each sprout has plenty of room to grow. If you plant more densely with the intention of thinning your sprouts, don't get sentimental about them later and decide to forgo thinning. Each plant needs appropriate space for its roots to grow, for its leaves to spread out, and for its leaves to catch all the sun it can, unhindered. I've ruined a garden by not wanting to pull out those beautiful extra shoots - they were too busy competing with each other to produce any fruit. Likewise, be specific in following the recommended planting depth. Some small seeds you can simply drop on top of the soil, and maybe gently rake a little dirt on top. Larger seeds need to be pressed as deep as 2- 2 1/2 inches. One good rule of thumb is to plant a seed as deep as 1 1/2 times the length of the seed.
In order to germinate (sprout), seeds need warm soil and must stay wet. By this time of the season, your soil will be warm enough; but keep a close eye on how fast your soil might dry out. If we don't get consistent rain, you may need to water your seeds as much as twice/day to keep them damp. If a seed is in the process of germinating and it dries out completely, it will die. Continue to keep close watch on your tender sprouts as they also cannot afford to dry out, and you'll want to be vigilant about pests at this stage. The pests that most commonly attack my sprouts are slugs. That cayenne pepper trick I mentioned earlier works just fine; I reapply after a few waterings or after rain. Generally once a sprout gets several inches tall and has put out 3 and more sets of leaves, it isn't all that susceptible to pests. Healthy plants are the best deterrent against pests or disease. We'll talk more about this later, but for now - feel free to leave comments about your pest issues and I'll tell you what I know about each one.
When planting seedlings, the things to pay attention to are also spacing and depth. Hopefully you'll have a good tag or label on your plant with a recommended spacing, and as far as depth you'll want to plant so that the soil level in your garden just barely covers the top of the potting soil held together by the seedling's roots. Before planting your seedlings, water them well. If the soil your seedlings came in is dry, the water you give them once they are planted my not penetrate their roots, instead running around the roots into your garden soil, failing to give them a great start.
When removing seedlings from plastic pots, first squeeze the bottom of the pot on all sides to loosen the roots. Then pull very gently on the stem while pushing on the bottom of the pot. If the plant does not slide out easily, squeeze the bottom of the pot some more. You don't want to pull hard on the stem since those young roots are tender and will break easily, sometimes ruining the plant. If you've got plants in peat or cardboard-type pots, it is true that you can plant the entire pot straight into your garden. Well, true mostly. Be sure to remove any plastic labeling first, and it's very important to peel off the portion of the pot that extends above the level of potting soil. The material that these pots are made of wicks strongly, and if any of the pot extends above the soil in your garden, it will suck up all the soil moisture around the roots and send it sailing on the spring breezes. I also feel around the pot a bit - often the plant's roots have not penetrated the very bottom of the pot and when that's the case, I peel off that portion of the pot too - just to give more opportunity for plant roots to make a strong escape into my garden soil. Once you've planted your seedlings, water them well - giving them a great start with plenty of moisture, but also helping your garden soil to make the best contact around the new plant's roots.
A Final Note About Spacing
There are a few of ways to look at plant spacing. The idea of Square Foot Gardening, popularized by a book and PBS series of the same name, is where you intensely nurture your soil and then use a closer spacing in order to maximize a small gardening space. This method also recommends staking or growing upwards as much as possible, so that more ground area is available for more plants. Square foot gardening is very successful when your soil is rich and you're able to consistently tend to your plants to keep them healthy. Another way of looking at gardening is to have fewer plants and to give each plant all the room it needs to flourish. The difference between the two is that with square foot gardening you may have 6 or 8 pepper plants in an area that is 4' x 4' and though those plants won't get huge, the intensive care they receive will make them thrive and produce well. On the other hand, by giving 3 or 4 pepper plants the same 4' x 4' area, they will have plenty of room to grow as big as they want - producing a great crop due to their size and lack of competition. In a more traditional row-type garden, farmers often plant more seedlings closer than would be ideal - even spacing peppers 1' apart. They will most certainly not reach their full health or potential this way, but because there are so many plants, the harvest may be the same as with a handful of plants that were maintained intensely.
Friday, April 23, 2010
Seeds or Seedlings?
When shopping for seeds and seedlings, one can get overwhelmed at a garden center. The shelves of seedlings - fresh young plants available in 4-,6-,or 9-packs and sometimes in singles - are just begging you to take them home and put them in your garden. You'll see as many as twenty different types of tomatoes; a wide variety of mild, sweet, and hot peppers; several different versions of pickling, burpless, long, and seedless cucumbers; and by the time you get to the squash you won't even care anymore whether it has a crook in it's neck! And then as you start to add up that $3.50 or so per single plant or per pack, you'll feel compelled to wander over to the seed displays, thinking you may fare better over there.
It is helpful to do some homework before you go. First, get in your head which vegetables you really want in your summer garden this year, and think about how many of each you might like. Remember that you'll likely get more produce from a few plants that are well-cared for than many plants that you can't keep up with. Prioritize, and make up your mind ahead of time what is most important to you. If you want to grow tomatoes, do you want full-sized fruits, or plum tomatoes, or cherry tomatoes? It's also helpful for you to measure and sketch out your garden space, thinking through how much space you really have. Four square feet of garden space are great for 2 full-sized tomato plants, 4 pepper plants, 4 eggplant, 3 cucumber plants, and 2 squash or zucchini plants. Go ahead and make a shopping list, complete with the numbers of each type you intend to buy.
You can feel confident that when it comes to seedlings, the ones you see in your local garden center are appropriate for your garden. Unless something is labeled "new," generally the varieties sold in most garden centers are tried-and-true. Look carefully at your labels though - to make sure that the banana pepper you might be buying is a sweet and not a hot variety, or to understand ahead of time that a particular tomato might be completely ripe and ready to eat when it's still yellow!
When it comes to tomatoes, peppers, and eggplant, I do recommend that a beginner or novice gardener go ahead and start with seedlings. Seedlings will get off to a great start if planted correctly and watered, and you'll soon be that much closer to a harvest. Seed selections are often very similar to the seedling varieties available, but there will likely be a few more unique types to choose from. Seeds will obviously take longer to get started - usually 1-2 weeks before germination (sprouting) and then another 2 weeks to reach the size of the seedlings you see at your garden center. There's also a lot that can happen to those sprouts along the way. They will be much more susceptible to drying out, being attacked by pests, or even catching some sort of fungus. Even if you want to experiment with a few seeds, go ahead and get a good start with a couple of ready-to-go plants, just so you won't get completely discouraged if things don't work out as well as you might hope.
On the other hand cucumber, squash, and melons grow strong quickly straight from seeds; so well in fact, that it can be a waste of money buying seedlings. An old-time rule of thumb for these crops is to plant the seeds straight into your garden soil on May 1. These days you're completely able to do so earlier - certainly by April 15. Maybe it's global warming... I don't know. You'll still need to make sure the soil where you plant the seeds and the appearing sprouts stay damp, and this may require daily watering. Bright sunny days can dry soil out quickly, but so can wind - so keep your eye on both when you're debating whether to water. Water only to keep the soil damp and not sopping; too much water can encourage growth of fungi. Pests to look out for early on are slugs and cutworms - they love to chew through the base of these type of sprouts at night. In general, it's a little early for these pests, but if you find a felled sprout or two one morning, generously sprinkle some cayenne pepper around the remaining ones.
Row crops such as okra, green beans, lima beans, field peas, or corn are almost always directly seeded into the soil, though I did happen to see some corn seedlings at Lowe's a couple of weeks ago. These crops are also better seeded a little later in the season when it's consistently warm at night, and so I'll save them for a later post.
Wednesday, April 21, 2010
Solstice and Equinox: Astronomy and Plants
A Solstice occurs twice each year and represents the two extremes of the earth's axis in relation to the sun. Generally in the northern hemisphere June 21 is our summer solstice and December 21 is our winter solstice, and they also respectively represent the first days of summer and of winter. In the southern hemisphere it's the other way around. These dates can shift a little due to slight differences in actual astronomical time and how we measure time with our calendars. June 21 is the longest day in the northern hemisphere, meaning that the ratio of daylight to darkness on that day is most disproportional in favor of daylight. Beginning on June 22 and each day thereafter, the sun will rise just a little bit later and set just a little bit earlier, slowly increasing the amount of darkness in each 24 hours.
An Equinox also occurs twice each year and represents the mildest angles of the earth's axis in relationship to the sun. Spring Equinox generally occurs on March 20 and Autumnal Equinox generally occurs on September 22. On these days there are 12 hours of daylight and 12 hours of darkness.
One of the strongest relationships between the astronomical calendar and summer vegetable crops is how sensitive they are to the ratio of daylight to darkness. The amount of time a plant is exposed to sunlight, and then the corresponding time it is in darkness trigger different responses. As a young plant enjoys the ever-lengthening days of sunlight, it grows big and tall, full of beautiful big leaves and then begins to flower; but the moment it realizes the days are decreasing it begins to focus it's energy on one thing: make fruit and therefore seeds. It's a biological clock kindof thing. The growing season between the Last Frost Date and summer solstice can be viewed as a plant's youth, the season after summer solstice as the plant's sexual prime, and as the season begins to close toward the First Frost Date and Autumnal Equinox - the plant will be in old age and will be fighting for any last ditch effort to leave behind some final prodigy.
So as you plan your garden plantings, you'll want to plant as early as is safe, but many common vegetables can be planted up until the end of May with flourishing results. Even planting late, your seedlings will be in tune with this astronomical clock and will actually grow more quickly as a result.
Saturday, April 17, 2010
End of Tax Season = Open Season for Planting your Garden!
Here in the northern part of Georgia, we are very lucky to have a lengthy growing season. Some crops you can seed into your garden in late January, others can be planted as late as September! But for the bulk of vegetables that we commonly desire to grow ourselves, April 15 marks the free-for-all for getting it into the ground. This is based on a very important calculation: the estimated Last Frost Date for your area. Frost can kill tomatoes, peppers, squash, cucumbers, and the like - and so if you're planting such summer crops prior to the LFD, you'll want to watch the weather report and have some type of plan for caring for your seedlings should you get caught by a late cold snap.
The LFD for your area can vary based on who you talk to, but in general, your local extension service can tell you the most "official" date. There will be a general LFD that is generally accepted for your locale that doesn't change from year to year, but there are also really smart people out there who calculate the specific date annually. The Farmer's Almanac has a great chart (www.almanac.com/gardening/planting-dates) where you can enter your zip code and it will not only give you an LFD, but will calibrate a planting calendar with specific dates of when to plant what - even down to planting according to moon phases! Following that schedule will surely make you feel like you know what you are doing.
Right where I live, it's been a little debatable whether our LFD is April 1 or more like April 15. The Farmer's Almanac just told me that there is a 50% chance that we will be frost-free after March 30. But just a 50% chance. So if you live near me and you want to plant and move forward having no regrets, April 15 is just fine - and it's a sunny Saturday with a sunny Sunday to follow - so if you haven't already, get out to a garden center and buy some seeds and/or plants!
Don't buy too many though - keep in mind the area that you have available to plant, and remember that that little tomato seedling in a 9-pack will really need about 18" -24" square to grow to it's full potential. Start small, and no hurry - I'll follow this post up with why you can still take your time planting.
Friday, April 16, 2010
Raise Your Beds
Raised-bed gardening can be thought of as a hybrid between gardening in the ground and gardening in containers, and it has many of the same advantages as both of these methods. Raised beds are essentially a small retaining wall of some sort - wood, brick, masonry blocks, even hay bales can work, and in some cases you might even see tires used for this purpose. Sometimes the tires are painted white first - it all depends on the look you might be going for. Regardless of your chosen materials, once your wall - or frame - is built, it is then filled with a good planting soil or compost mixture, and then your raised bed garden is ready for planting!
A raised bed garden is very appropriate when your underlying soil is either very hard, very rocky, very weedy, or infertile. It gives you the opportunity to bring in the best garden soil or compost you can find (or you can afford) instead of relying on the dirt you happen to be blessed with. Unlike container gardening however, a raised bed has a larger soil source available for root growth, for insulation against heat or cold, and for absorption and availability of water. Four things are basic to building a raised bed garden: finished height of your garden, subsoil preparation, building the frame, and choosing your soil.
Finished Height of your Garden
Desired height of your raised bed should be decided upon before you begin, as it will determine how you accomplish all other steps. The higher your garden, the less you have to work the subsoil. If you are raising your bed a minimum of 24", your subsoil will only need a little scarifying. As roots of vegetable plant thrive best when given at least 18" of friable soil, any height less than 18" would necessitate some digging or tilling of your subsoil.
The height of your garden will determine what type of materials you use for your frame - and vice versa - your preferred materials will influence the exact height of your garden. For instance, if you are using simple wooden boards for your frame, they can be purchased in say 6", 8", 10", 12" or more widths. Basic hollow concrete blocks are roughly 7 1/2" tall. Two of them mortared together will provide a height of 15 1/2". As you formulate in your mind the height you're going for, make sure the materials you might consider will easily accomplish your goal within budget.
The taller your garden frame, the more area you will have to fill with garden soil. Simple mathematics can help you get an idea of how much soil you'll be needing. Measure the ground area your garden is intended to cover. If you're building a frame that is to be 4' by 8', you'll have 32 square feet of garden area. If this frame is to be one foot tall, you'll need 32 cubic feet of soil. If it is to be 2 feet tall, you'll need 64 cubic feet. If purchasing bagged soils or compost, look on the bag for a determination of how many cubic feet of medium is included in each bag. If purchasing garden soil or compost in bulk, you'll divide the number of cubic feet by 27 in order to communicate your needs in cubic yards. If you're going to be shoveling your own compost from a local horse farm or the like, measure the interior of the truck bed you intend to use and compare the cubic feet with your garden needs to see how many truckloads you'll need to shovel. Keep in mind that regardless of the soil volume you determine, your soil will settle throughout the growing season and you'll likely need to add soil or compost to your garden after each of the first few planting seasons.
I strongly recommend that if you are planning out a raised bed garden, you carefully consider garden height with regards to your budget. I know from experience that it's very easy to underestimate the amount of framing material or the amount of garden soil you'll need to accomplish your goal. Again - if the work or costs seem to get too high quickly, start small. Begin with your intended garden height, but go with a smaller square footage to start out with.
Subsoil Preparation
Subsoil refers to the surface of the soil on which you plan to build your garden. At the least, you'll want to remove any existing grass, weeds, or other vegetation from the soil surface and scarify, or scratch up the subsoil. Removing any existing plants will prevent undue settling, and scratching up the soil's surface will improve drainage. Imagine that if the surface of your subsoil were rock hard and you built a solid garden frame and filled it with soil, it would have the potential of holding in too much water similar to a container garden with no drain holes.
Again, vegetable plant roots thrive when they have at least 18" of loose, friable soil, and so if your finished garden height is to be 12", you'll need to loosen the top 6" of your subsoil. If your garden height is to be 6", you'll need to dig up or till 12" deep into your subsoil. Keep in mind that this 18" would be measured from the top of the soil in your finished raised bed garden, which will likely be an inch or so lower than the finished edge of the frame.
If your decision to opt for a raised bed garden is based on an undesirable weed problem within your subsoil, you may wish to consider some sort of landscape fabric to be placed as a barrier between your subsoil and the fresh soil you are bringing in. In this case you should be planning on providing a healthy 18" soil depth for your garden, and you should purchase some quality fabric. A couple of years ago I went searching for some good fabric to use for a similar application and I was completely disgusted with what I found at Lowe's and at Home Depot. The stuff tore easily when I pressed my fingernail into it, and I do not keep my fingernails long or sharp! Instead I called a landscaper friend of mine and asked him if he had a spare length of silt fence - and that did the job I needed it to do!
Building Your Frame
Budget is often the guiding factor in choosing materials and construction methods for a good garden frame. If your budget is very small, consider looking around online for a potential source of free concrete blocks, bricks, wood, or landscape timbers. Pre-formed masonry blocks intended for use in building retaining walls are excellent choices and there's a good chance you could find enough left over from a contractor's job to meet your needs. If your budget is substantial and you're looking for a permanent, professional-looking frame, mortared brick or concrete masonry finished in stucco is perfectly suitable; however, when constructing a solid masonry wall that is more than about a foot in height, you'll want to make sure that appropriate drainage holes are fashioned along the lower rows of bricks or blocks so that excess water does not undermine the construction over time.
When using wood there are the two options of natural wood or pressure-treated lumber. Pressure-treated lumber has had chemicals applied to the wood under high temperature and pressure and these toxic chemicals (they used to include arsenic) have been proven to leach into garden soil. It will have an obvious green color to it and will have labels or stamps indicating it has been treated. Most if not all lumber sold as "landscape timbers" are highly impregnated with chemicals, and true railroad ties contain the additional evil of creosote. Thus using natural lumber is a safer choice and the only choice if your desire is to garden organically, but you cannot count on natural lumber to give you a permanent garden structure. If using natural lumber for your frame, you'll need to have in mind replacing a board here and there beginning in the 3rd or so year after starting your garden. Nails work just fine in holding such a garden frame together; screws work even better. Just make sure with either fastener that it is suitable for outdoor use so you'll get the longest life possible out of them.
Another great and easy way to put natural lumber together is this great little deal from Gardener's Supply Company:

 Choosing Your Soil
If purchasing bagged soils for filling your raised bed, I'll again recommend a 1/2 and 1/2 mixture of mushroom compost (or some other composted manure or organic matter) and soil conditioner. If purchasing your soil in bulk where it will either be loaded into your own truck or delivered to your home in a dump truck, you'll want to be specific in what you ask for. Simple "topsoil" is decent but is likely to have a high clay content and possibly a high content of weed seeds. Often a mix of topsoil and compost will be available, and this is very suitable. Compost alone will also likely do the trick. Question the manager carefully about sources of topsoil, weed seed content, sources of compost, and whether the soil has been treated chemically in any way or if any chemical fertilizers have been added. If either of those last two points are affirmative, it's not all bad, depending on your slant towards growing it all organic.
A raised bed garden is very appropriate when your underlying soil is either very hard, very rocky, very weedy, or infertile. It gives you the opportunity to bring in the best garden soil or compost you can find (or you can afford) instead of relying on the dirt you happen to be blessed with. Unlike container gardening however, a raised bed has a larger soil source available for root growth, for insulation against heat or cold, and for absorption and availability of water. Four things are basic to building a raised bed garden: finished height of your garden, subsoil preparation, building the frame, and choosing your soil.
Finished Height of your Garden
Desired height of your raised bed should be decided upon before you begin, as it will determine how you accomplish all other steps. The higher your garden, the less you have to work the subsoil. If you are raising your bed a minimum of 24", your subsoil will only need a little scarifying. As roots of vegetable plant thrive best when given at least 18" of friable soil, any height less than 18" would necessitate some digging or tilling of your subsoil.
The height of your garden will determine what type of materials you use for your frame - and vice versa - your preferred materials will influence the exact height of your garden. For instance, if you are using simple wooden boards for your frame, they can be purchased in say 6", 8", 10", 12" or more widths. Basic hollow concrete blocks are roughly 7 1/2" tall. Two of them mortared together will provide a height of 15 1/2". As you formulate in your mind the height you're going for, make sure the materials you might consider will easily accomplish your goal within budget.
The taller your garden frame, the more area you will have to fill with garden soil. Simple mathematics can help you get an idea of how much soil you'll be needing. Measure the ground area your garden is intended to cover. If you're building a frame that is to be 4' by 8', you'll have 32 square feet of garden area. If this frame is to be one foot tall, you'll need 32 cubic feet of soil. If it is to be 2 feet tall, you'll need 64 cubic feet. If purchasing bagged soils or compost, look on the bag for a determination of how many cubic feet of medium is included in each bag. If purchasing garden soil or compost in bulk, you'll divide the number of cubic feet by 27 in order to communicate your needs in cubic yards. If you're going to be shoveling your own compost from a local horse farm or the like, measure the interior of the truck bed you intend to use and compare the cubic feet with your garden needs to see how many truckloads you'll need to shovel. Keep in mind that regardless of the soil volume you determine, your soil will settle throughout the growing season and you'll likely need to add soil or compost to your garden after each of the first few planting seasons.
I strongly recommend that if you are planning out a raised bed garden, you carefully consider garden height with regards to your budget. I know from experience that it's very easy to underestimate the amount of framing material or the amount of garden soil you'll need to accomplish your goal. Again - if the work or costs seem to get too high quickly, start small. Begin with your intended garden height, but go with a smaller square footage to start out with.
Subsoil Preparation
Subsoil refers to the surface of the soil on which you plan to build your garden. At the least, you'll want to remove any existing grass, weeds, or other vegetation from the soil surface and scarify, or scratch up the subsoil. Removing any existing plants will prevent undue settling, and scratching up the soil's surface will improve drainage. Imagine that if the surface of your subsoil were rock hard and you built a solid garden frame and filled it with soil, it would have the potential of holding in too much water similar to a container garden with no drain holes.
Again, vegetable plant roots thrive when they have at least 18" of loose, friable soil, and so if your finished garden height is to be 12", you'll need to loosen the top 6" of your subsoil. If your garden height is to be 6", you'll need to dig up or till 12" deep into your subsoil. Keep in mind that this 18" would be measured from the top of the soil in your finished raised bed garden, which will likely be an inch or so lower than the finished edge of the frame.
If your decision to opt for a raised bed garden is based on an undesirable weed problem within your subsoil, you may wish to consider some sort of landscape fabric to be placed as a barrier between your subsoil and the fresh soil you are bringing in. In this case you should be planning on providing a healthy 18" soil depth for your garden, and you should purchase some quality fabric. A couple of years ago I went searching for some good fabric to use for a similar application and I was completely disgusted with what I found at Lowe's and at Home Depot. The stuff tore easily when I pressed my fingernail into it, and I do not keep my fingernails long or sharp! Instead I called a landscaper friend of mine and asked him if he had a spare length of silt fence - and that did the job I needed it to do!
Building Your Frame
Budget is often the guiding factor in choosing materials and construction methods for a good garden frame. If your budget is very small, consider looking around online for a potential source of free concrete blocks, bricks, wood, or landscape timbers. Pre-formed masonry blocks intended for use in building retaining walls are excellent choices and there's a good chance you could find enough left over from a contractor's job to meet your needs. If your budget is substantial and you're looking for a permanent, professional-looking frame, mortared brick or concrete masonry finished in stucco is perfectly suitable; however, when constructing a solid masonry wall that is more than about a foot in height, you'll want to make sure that appropriate drainage holes are fashioned along the lower rows of bricks or blocks so that excess water does not undermine the construction over time.
When using wood there are the two options of natural wood or pressure-treated lumber. Pressure-treated lumber has had chemicals applied to the wood under high temperature and pressure and these toxic chemicals (they used to include arsenic) have been proven to leach into garden soil. It will have an obvious green color to it and will have labels or stamps indicating it has been treated. Most if not all lumber sold as "landscape timbers" are highly impregnated with chemicals, and true railroad ties contain the additional evil of creosote. Thus using natural lumber is a safer choice and the only choice if your desire is to garden organically, but you cannot count on natural lumber to give you a permanent garden structure. If using natural lumber for your frame, you'll need to have in mind replacing a board here and there beginning in the 3rd or so year after starting your garden. Nails work just fine in holding such a garden frame together; screws work even better. Just make sure with either fastener that it is suitable for outdoor use so you'll get the longest life possible out of them.
Another great and easy way to put natural lumber together is this great little deal from Gardener's Supply Company:

You simply slide your boards into the slots to form a corner. They are also available in 10" and 12" heights, and in a version that pivots so that you're not restricted to right angles. The finished garden can look something like this:

If purchasing bagged soils for filling your raised bed, I'll again recommend a 1/2 and 1/2 mixture of mushroom compost (or some other composted manure or organic matter) and soil conditioner. If purchasing your soil in bulk where it will either be loaded into your own truck or delivered to your home in a dump truck, you'll want to be specific in what you ask for. Simple "topsoil" is decent but is likely to have a high clay content and possibly a high content of weed seeds. Often a mix of topsoil and compost will be available, and this is very suitable. Compost alone will also likely do the trick. Question the manager carefully about sources of topsoil, weed seed content, sources of compost, and whether the soil has been treated chemically in any way or if any chemical fertilizers have been added. If either of those last two points are affirmative, it's not all bad, depending on your slant towards growing it all organic.
Subscribe to:
Posts (Atom)